
Introduction
OSSex is an Arduino library for interacting with Comingle open-source sex toys. If you have a Mod dildo or a Dilduino circuit board, OSSex can make it easier for you to reprogram your toy as you desire.
Installation
Once you have OSSex installed, include it in your sketch to use it:
#include <OSSex.h>
#include <Wire.h>

void setup() {
  ...
}

void loop() {
 ...
}
Head to the latest release page and download the source in zip format.
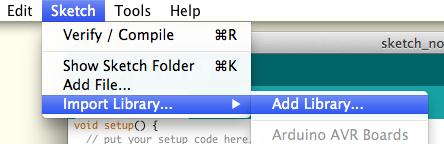
Open the Arduino software, and select the “Sketch” menu, then “Import Library…”, and finally “Add Library…”. Choose the OSSex zip file that you just downloaded. More information is available at the Arduino Libraries page.
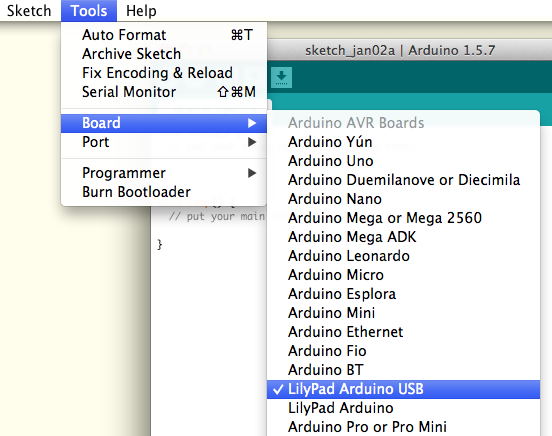
In the Arduino application, make sure to set your board type as a “Lilypad Arduino USB”:
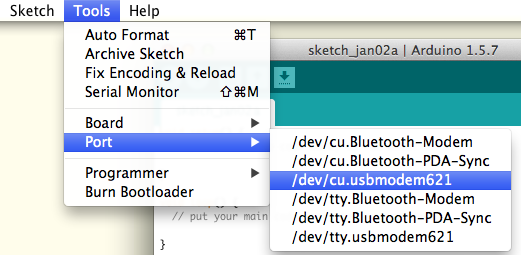
Finally, plug in your toy and turn it on. In the Tools menu, choose Port, and then you can select the port to which your toy is connected. On a Mac, this will show up as a usbmodem port, often as something like /dev/tty.usbmodem621 or /dev/cu.usbmodem621 – you can select either the tty.usbmodem port or the cu.usbmodem port and either will work.
On a Windows machine, your toy will show up as an additional COM port.
OSSex advantages
Pin setup
The various digital and analog pins used in the Mod and Dilduino are all listed in the setID() function of OSSex.cpp in the OSSex library. Simply including the library will automatically create a Toy object that is configured as a Mod/Dilduino, so you don’t have to do anything else to get all of your pins set up. The Hacker Port in particular becomes far more convenient: it requires a high or low signal on two separate pins to set its state, and that state then exposes 2 of 6 possible different pins.
Unobtrusive pattern functions
OSSex creates a “second loop” that runs independently of (and with priority over) the Arduino’s main loop() function. It uses this loop to update peripherals (like the button attached to your Mod/Dilduino, and readings from an attached Nunchuck or sensor) and to run vibration patterns so that you can keep those things out of the main loop() function. This makes your code cleaner and prevents pauses in a vibration pattern from pausing other code.
This is what we mean by unobtrusive. The second loop runs every millisecond, and only makes changes if needed. This prevents it from unduly delaying other code, unless of course you need something with sub-millisecond resolution, in which case we’d love to hear what you’re up to.
OSSex caveats
Using delay(), millis(), micros(), or Serial commands in a button click handler
Click handler setting a flag that is checked in
loop():
bool clicked = false;

void setup() {
  ...
  Toy.attachClick(click_func);
  ...
}

void click_func() {
  clicked = !clicked;
}

void loop() {
  ...
  if (clicked) {
    (do something)
  }
  ...
}
All of the functions associated with button clicks (single click, double click, button hold) are handled by OSSex’s second loop. The second loop runs through an Arduino interrupt routine. Interrupt routines are functions that run with priority over other code; the processor will stop whatever else is happening to run an interrupt routine.
The problem is that time functions like delay(), millis(), and micros(), all work in their own separate interrupt routine. If OSSex’s second loop is running then the time interrupt routine isn’t. So time, as observed by delay(), millis(), and micros(), basically stops when the second loop is running: delay() will return instantly, millis() will report the same value over and over, and things that depend on delay() or millis() (such as Serial commands) will not work correctly.
Since OSSex updates the button state in the second loop, time-based functions (like blinking an LED in response to a button click) will not work in click handlers as intended. One work-around for this is to have the button click handler function set a flag that is observed in loop().
Another potential option is to use delayMicroseconds(). delayMicroseconds() runs a calibrated number of “no operation” instructions to achieve a delay and doesn’t depend on interrupts. However, since delayMicroseconds() takes an unsigned int as an argument, the largest number of microseconds you can delay with a single call is 65,535 (or 65.535 milliseconds).
Basics
Once the library is installed, add the OSSex.h file and the Wire.h file to your sketch:
#include <OSSex.h>
#include <Wire.h>

void setup() {
 ...
}

void loop() {
 ...
}
The library will create a Toy object that you can use to interact with your toy. Toy defaults to being a Comingle Mod (or Dilduino), and this is currently the only option, but other types of toys can be created and used.
All interaction with your toy happens through the Toy object.
Turning a motor (output) on/off
Toy.setOutput(int outNumber, int powerLevel);
The first motor would have an outNumber of 0. -1 can be given for outNumber as shorthand for all outputs/motors.
powerLevels are constrained to a value from 0 to 255 inclusive. A powerLevel of 0 will turn the output off.
outNumbers greater than the number of available outputs will be divided by the number of available outputs and the remainder will be used, i.e. if you try to turn on motor 4 in a 3-motor toy, motor 1 will turn on, since the remainder of 4/3 is 1.
Negative outNumbers will be made positive, except for the -1 special case.
Set the LED to a particular power level
Toy.setLED(int ledNumber, int powerLevel);
setLED() sets a given ledNumber to a given powerLevel. powerLevel is constrained from 0 to 255 inclusive, with powerLevel of 0 turning the LED off.
This function does not yet support the -1 shorthand to apply powerLevel to all LEDs.
Read an input
Toy.getInput(int inNumber);
getInput() is a wrapper for analogRead(). inNumber on a Mod is either 0 or 1, since the Mod has two inputs through its Hacker Port. These inputs are labeled HP0 and HP1 on the Dilduino.
Run an vibration pattern
Running a pattern from an array:
Toy.runShortPattern(int* pattern, unsigned int patternSize);
Running a pattern from a pattern function:
Toy.runPattern(int *function(int seq));
runShortPattern() and runPattern() allow you to create and run vibration patterns so that you can turn the motors on and off in whatever sequence you can conceive. See the Vibration Patterns section for more in-depth information on how to create your own vibration patterns.
runShortPattern() will not return until the pattern has completed. That means the rest of your code will not run until the pattern is finished.
runPattern() will return immediately.
runShortPattern() and runPattern() return 1 on success and 0 on error (patternLength is null or if the first two steps of the pattern function are unavailable).
Control the button behavior
Button click handlers:
Toy.attachClick(void *function());
Toy.attachDoubleClick(void *function());
Toy.attachLongPressStart(void *function());
Toy.attachLongPressStop(void *function());
Toy.attachDuringLongPress(void *function());
Example to turn the LED on or off with a button click:
int m = 255;

void led() {
  Toy.setLED(0, m);
  if (m == 255) {
    m = 0;
  } else {
    m = 255;
  }
}

void setup() {
  Toy.attachClick(led);
}
OSSex uses the OneButton Arduino library to allow single click, double click, and long press events on the device’s button(s).
Each of the handlers will execute function when the corresponding action happens (click, double-click, click-and-hold, etc.). attachClick(), for instance, will execute function whenever it detects a single click.
Vibration patterns
You can make your toy run all kinds of vibration patterns: make them fade in and out, respond to a sensor, jump around randomly, be on full-blast, however you want.
A vibration pattern is a sequence of steps. Each step has 4 parts:
- The power for motor 0
- The power for motor 1
- The power for motor 2
- How long the step should run (in milliseconds)
The step {40, 0, 0, 5000} would turn motor 0 on to a power level of 40 for 5 seconds before the next step would run.
runShortPattern()
Turn all motors on to a power of 200 for half a second (500 milliseconds), then turn them off for 500 milliseconds. Since
runShortPattern()is being called fromloop(), the pattern will run both of its steps and finish, but then start again.
int pattern[][4] = {
    {200, 200, 200, 500},
    {0, 0, 0, 500},
};
unsigned int patternSize = sizeof(pattern) / sizeof(int) / 4;

void loop() {
  Toy.runShortPattern(*pattern, patternSize);
}
Pattern functions become necessary for more complicated patterns. Suppose we wanted to turn all the motors on and ramp their intensity up to max (255), then ramp back down to 0, all in steps of 5. Making an array is tedious, and makes it difficult to modify the pattern in the future:
int pattern[][4] = {
    {0, 0, 0, 50}, {5, 5, 5, 50}, {10, 10, 10, 50}, {15, 15, 15, 50}, {20, 20, 20, 50}, {25, 25, 25, 50}, ...
};
You can make a pattern array and run it with runShortPattern(). This way requires you to come up with your patterns by hand, and is not practical for large patterns, but perfectly fine for simple ones.
runShortPattern() will not return until the pattern has finished running. That means the rest of your code will not run until the pattern is finished.
As your patterns get larger, you will start to run in to memory limits on the toy, and the pattern will become more unwieldy if you want to make changes: suppose you want the change the duration of each step from 50ms to 70ms. This is an annoying task if you have to change 200 steps.
runPattern()
The pattern function
blip()setsToy.stepand returns 1. In this example,blip()will run endlessly since it’s started fromsetup()and there’s no code in place to stop it.
int blip(int seq) {
  if (seq % 2) {
    Toy.step[0] = 0;
  } else {
    Toy.step[0] = 200;
  }
  Toy.step[1] = Toy.step[2] = Toy.step[0];
  Toy.step[3] = 1000;
  return 1;
}

void setup() {
  Toy.runPattern(blip);
}
Revisiting our idea to ramp power from 0 to 255 in steps of 5, and then back down to 0:
int fade(int seq) {
  // set step timing
  Toy.step[3] = 50;

  // Our sequence runs from 0 to 255 and back to 0 in increments of 5
  // 0 -> 255: 255/5 = 51 steps
  // 255 -> 0: 255/5 = 51 steps
  // ----------------- 102 steps total

  // normalize sequence
  seq %= 102;

  if (seq <= 51) { // ascending
    Toy.step[0] = 5 * seq;
  } else { // descending
    Toy.step[0] = 255 - 5*(seq-51);
  }
  Toy.step[1] = Toy.step[2] = Toy.step[0];
  return 1;
}
You could also get even simpler, and use a periodic function like
sin(),cos(),tan(), etc. Changing parameters for the whole pattern becomes very easy:
int fadeCos(int seq) {
  Toy.step[0] = round(127 * cos((seq / (8*PI))-PI) + 127);
  Toy.step[1] = Toy.step[2] = Toy.step[0];
  Toy.step[3] = 50;
  return 1;
}
You could also print the output of your function to the serial console to make sure it’s behaving appropriately:
void setup() {
  Serial.begin(9600);
}

int m = 0;
void loop() {
  fade(m);
  Serial.print("step[0]: ");
  Serial.print(Toy.step[0]);
  Serial.print(" step[1]: ");
  Serial.print(Toy.step[1]);
  Serial.print(" step[2]: ");
  Serial.print(Toy.step[2]);
  Serial.print(" step[3]: ");
  Serial.print(Toy.step[3]);
  m++;
  delay(300);
}
runPattern() is used with pattern functions. Pattern functions calculate the next step in a pattern as needed rather than storing every step of the pattern. Pattern functions take up a lot less memory, and are more versatile because you can do almost anything inside of them that you could do in a normal function (call other functions, chain functions together, read a sensor, add random noise, etc.)
runPattern() will run your pattern function every time it needs the next step in the pattern. It provides an increasing sequence number as an argument to the pattern function.
A step-by-step run-through of the example with the blip() function is:
- Run
blip(0) - Read
{200, 200, 200, 1000}fromToy.step - Run it (turn all motors on to 200 for 1 second)
- After 1 second, run
blip(1) - Read
{0, 0, 0, 1000}fromToy.step - Run it (turn all motors off for 1 second)
- After 1 second, run
blip(2) - Read
{200, 200, 200, 1000}fromToy.step - Run it (turn all motors on to 200 for 1 second)
- After 1 second, run
blip(3)
… (run forever, or until blip() returns 0 or NULL, or something else stops the pattern)
runPattern() will return immediately, even while your pattern continues to run, because pattern functions lend themselves to running for a very long time. This way you can create functions that are 5, 500, or infinite steps in duration without your pattern function delaying other code from running.
In the fadeCos() example, you might wonder where 127 * cos((seq / (8*PI))-PI) + 127 came from. It’s basically the result of progressively changing cos(x) until it gave the right behavior. One of the easiest ways to do this is by typing “cos(x)” in to Google, viewing the graph of the function and modifying it until it looks right (starts at 0, peaks at near 255, has a long enough period that it smoothly transitions power levels). The steps for doing this are laid out in our patterns howto.
Stopping patterns
We can modify the
blip()function to terminate after running the on-off sequence twice:
int blip(int seq) {
  /* NEW */
  seq %= 5;
  if (seq % 2) {
    Toy.step[0] = 0;
  } else {
    Toy.step[0] = 200;
  }
  Toy.step[1] = Toy.step[2] = Toy.step[0];
  Toy.step[3] = 1000;
  /* NEW */
  if (seq == 4) {
    return NULL;
  } else {
    return 1;
  }
}
There are 2 easy ways to stop a pattern. You can:
- Have the pattern function return 0 or NULL upon certain conditions being met (sequence number greater than some value, sensor reading below a certain threshold, etc.)
- Use the
stop()function, attached to a click handler for instance.
Queuing patterns
Adding a pattern to the queue:
int pat_function(int seq) {
  (some crazy code)
  return 1;
}

void setup() {
  Toy.addPattern(pat_function);
}
Cycling through the queue:
void click() {
  Toy.nextPattern();
}

void double_click() {
  Toy.previousPattern();
}

void setup() {
  Toy.attachClick(click);
  Toy.attachDoubleClick(double_click);
}
If you have multiple pattern functions on your device — and why not? — then you need a way of selecting between them. OSSex has an internal queue to which patterns can be added, and then cycled through forwards/backwards.
addPattern() is used to add pattern functions to the queue:
int addPattern(int *function(int));
nextPattern() advances the queue to the next pattern and starts it:
int nextPattern();
previousPattern() moves the queue to the previous pattern and starts it:
int previousPattern();
getPattern() returns the index number of the current pattern (starting at 0):
int getPattern();
runPattern(int) will run a specific pattern in the queue.
Modifying running patterns
Setting a button click to increase power by 10%, and a button double-click to decrease power by 10%:
void click() {
  Toy.increasePower();
}

void doubleClick() {
 Toy.decreasePower();
}

void setup() {
  Toy.setPowerScaleStep(0.1);
  Toy.attachClick(click);
  Toy.attachDoubleClick(doubleClick);
}
Vibration patterns can be modified while running to be faster/slower or more/less powerful. The quickest way to do this is via either setPowerScaleFactor(float scale) or setTimeScaleFactor(float scale). These will set the power and time scaling factors respectively.
The time and power scaling factor defaults to 1.0, and this means that all motor powers / step durations should be multiplied by 1.0, or run as-is. Setting the power scaling factor to 1.5 would run all patterns at 50% higher power (if possible), and setting the time scaling factor to 2.0 would run everything twice as slow (you’re increasing the time that each step takes).
You can also set a scaling step via setTimeScaleFactor(float step) or setPowerScaleFactor(float step). Once a step size is defined, you can call increaseTime(), decreaseTime(), increasePower(), or decreasePower() and it will increment/decrement the scaling factor by the scaling step: setting a time scaling step of 0.2 will cause the time scaling factor to decrease by 20% with each call to decreaseTime(), and increase by 20% with each call to increaseTime(); (and likewise for the power scaling step).
Hacker Port
The Hacker Port is a multiplexer that let you access analog inputs, PWM outputs, software serial lines, and the I2C interface through the same two pins. On a Mod, the Hacker Port is accessible through the large USB port at the base of the toy, along with 3.3V power (350 mA max).
The Hacker Port mode is set via setHackerPort(STATE). There are 4 possible options for STATE:
HACKER_PORT_AINfor analog input readings (pins A7, A9)HACKER_PORT_PWMfor PWM output (technically the same pins asHACKER_PORT_AIN: pins A7, A9, but they function as PWM-capable outputs too.)HACKER_PORT_I2Cfor I2C communication (pins 2 (SDA), 3 (SCL))HACKER_PORT_SERIALfor software serial connections pins (15, 14)
Any time setHackerPort() is called, Toy.device.HP0 and Toy.device.HP1 are set to the appropriate values. Toy.setHackerPort(HACKER_PORT_AIN) would set Toy.device.HP0 to A7, and Toy.device.HP1 to A9. This behavior is still being worked out.
The Hacker Port state can be retrieved with getHackerPort().
Quirks
Using the Hacker Port with capacitive touch applications is limited because the multiplexer has some built-in capacitance that can reduce the sensitivity of the capacitive touch readings. The resolution is generally low enough that it is fine for on/off touch applications, but will not work well for sensing proximity or touch pressure.
In software serial applications (Toy.setHackerPort(HACKER_PORT_SERIAL)), HP0 / pin 15 needs to be RX and HP1 / pin 14 needs to be TX.
Nunchuck
Setting up a Nunchuck:
WiiChuck nunchuck = WiiChuck(c_update, z_update);

bool c_update() {
  return nunchuck.cPressed();
}

bool z_update() {
  return nunchuck.zPressed();
}

void setup() {
  Toy.setHackerPort(HACKER_PORT_I2C);
  nunchuck.begin();
}

void loop() {
  nunchuck.update();
}
Nunchuck without update functions. (They can be declared later)
WiiChuck nunchuck = WiiChuck();

void setup() {
  Toy.setHackerPort(HACKER_PORT_I2C);
  nunchuck.begin();
}

void loop() {
  nunchuck.update();
}
OSSex includes a library called WiiChuck that can be used to interface a Wii Nunchuck with your toy. The Nunchuck communicates over I2C, includes a 3-axis accelerometer, X/Y joystick, and two buttons for only a few dollars. There’s lots of potential!
The begin() function initiates the I2C connection, and this can hang if you don’t have a nunchuck connected at the time. See the Workarounds section below for a way to fix this.
Once the connection is made, the update() function is used to read the the nunchuck status and do calculations like roll and pitch.
The c_update() and z_update() functions are button status functions. The WiiChuck library uses the same OneButton click-handling library as OSSex, so you can attach click, double-click and long-press click handlers to the Nunchuck’s C and Z buttons. However, since the C and Z buttons aren’t “real” buttons that can be read HIGH/LOW with digitalRead(), the OneButton library needs a function it can call to check the button click status, and that’s what c_update() and z_update() provide.
Available Functions
begin()– initiates the I2C connection with the nunchuck. Usually performed insetup()of the sketch.update()– reads the nunchuck’s status and updates various internal variables. Usually performed inloop()to keep the status up-to-date.readJoyX(),readJoyY()– returns the X and Y position of the nunchuck joystick.readAccelX(),readAccelY(),readAccelZ()– returns the X, Y, or Z acceleration.readRoll(),readPitch()— returns the roll and pitch.attachCUpdate(),attachZUpdate()— set the update function for the C, Z buttonscPressed(),zPressed()— returns the C or Z button click statusattachCClick(),attachCDoubleClick(),attachCLongPressStart(),attachCDuringLongPress(),attachCLongPressEnd()— click handlers for the C buttonattachZClick(),attachZDoubleClick(),attachZLongPressStart(),attachZDuringLongPress(),attachZLongPressEnd()— click handlers for the Z button
Workarounds
I2C Polling
Arduino’s included Wire library is missing some logic to deal with unresponsive I2C connections. If it tries to talk to an I2C device, it will wait indefinitely until it gets an answer, even if the device isn’t connected. From the github issue:
The Wire library has while loops that could go on forever. Although this will not happen in a normal situation, if it happens, the blocking stops the Arduino from working and that could be a safety issue.
The fix is here, but it needs to be made to the Wire library that comes with Arduino, so we can’t compensate for it in OSSex. It prevents everything on your Dilduino/Mod from freezing up if it’s trying to talk to a Nunchuck (or anything on the I2C bus) but there isn’t one connected.
Disabling USB HID
The Dilduino uses the ATmega32U4 microprocessor, which has a built-in USB interface. Arduino automatically includes code necessary for the ATmega32U4 to act as a USB keyboard or mouse (HID stands for Human Interface Device), and this code is included in your sketch even if you aren’t using it. It takes up about 1 KB of sketch space. It can be useful to disable if you need a bit of extra space for your sketch, or if you want to connect to your Mod from a USB OTG device (like a phone or tablet). Instructions for disabling HID are here.
Pins
Motors
- Motor 0: D5 (PWM capable)
- Motor 1: D10 (PWM capable)
- Motor 2: D11 (PWM capable)
LEDs
LED+: D13 (PWM capable)
Analog inputs
- Battery voltage: A0
- Input 0 (Hacker Port): A7 (PWM capable as D6)
- Input 1 (Hacker Port): A9 (PWM capable as D9)
- Extra analog inputs on A2 and A3
Buttons
- BTN: D4
Hacker Port
Selector pins: D8, D12
Selection Modes:
- LOW, LOW: Analog Input / PWM Output. A7, A9 connected to
HP0,HP1. - HIGH, LOW: I2C mode.
SDA(D2),SCL(D3, PWM capable) connected toHP0,HP1. - LOW, HIGH: Software serial mode.
SCK(D15),MISO(D14) connected toHP0,HP1. Recommended to useSCKas the receive pin andMISOas the transmit pin.
Examples
Cycle pattern
#include <OSSex.h>
#include <Wire.h>

void setup() {
  Toy.addPattern(fade_cos);
  Toy.addPattern(pulse);
  Toy.attachClick(click);
}

void loop() {
}

void click() {
  Toy.cyclePattern();
}

// fade all of the motors from low to high over and over
int fade_cos(int seq) {
  Toy.step[0] = Toy.step[1] = Toy.step[2] = round(127 * cos((seq / (8*PI))-PI) + 127);
  Toy.step[3] = 50;
  return 1;
}

// Randomly blip an output on for a short burst.
int pulse(int seq) {
  if (seq % 2) {
    Toy.step[0] = Toy.step[1] = Toy.step[2] = 0;
  } else {
    Toy.step[random(0,3)] = 144;
  }

  Toy.step[3] = 70;
  return 1;
}
This example cycles between vibration patterns (pulse and fade_cos) on button single click. We use addPattern to put pulse and fade_cos on the pattern queue, we call Toy.attachClick(click) to attach the click function to a button single-click.
Nunchuck click
#include <OSSex.h>
#include <Wire.h>
#include <WiiChuck.h>

WiiChuck nunchuck = WiiChuck(c_update, z_update);

bool c_update() {
  return nunchuck.cPressed();
}

bool z_update() {
  return nunchuck.zPressed();
}

void c_click() {
  Toy.stop();
}

void z_click() {
  Toy.increasePower();
}

void c_doubleclick() {
  Toy.cyclePattern();
}

void setup() {
  Toy.setHackerPort(HACKER_PORT_I2C);

  nunchuck.begin();

  nunchuck.attachCClick(c_click);
  nunchuck.attachCDoubleClick(c_doubleclick);
  nunchuck.attachZClick(z_click);

  Toy.addPattern(sharp_ramp);
  Toy.addPattern(weird2);
  Toy.addPattern(weird3);
  Toy.addPattern(flicker);
  Toy.addPattern(second);
}

void loop() {
  nunchuck.update();
}

int sharp_ramp(int seq) {
  const uint8_t fadeTable[32] = {0, 1, 1, 2, 2, 2, 3, 3, 4, 5, 6, 7, 9, 10, 12, 15, 17, 21, 25, 30, 36, 43, 51, 61, 73, 87, 104, 125, 149, 178, 213, 255};
  seq %= 32;
  Toy.step[0] = Toy.step[1] = Toy.step[2] = fadeTable[seq];
  Toy.step[3] = 12 ;
  return 1;
}
int weird2(int seq) {
  Toy.step[2] = round(127*cos(tan(tan(seq/(8*PI)))-PI/2)+127);
  Toy.step[3] = 30;
  return 1;
}
int weird3(int seq) {
  Toy.step[2] = round(50*(cos(seq/(8*PI)+PI/2) + sin(seq/2))+100);
  Toy.step[3] = 30;
  return 1;
}
int flicker(int seq) {
  Toy.step[0] = Toy.step[1] = Toy.step[2] = -1;
  if (seq > 2) {
    Toy.step[3] = 200;
  } else {
    Toy.step[3] = 20;
  }
  seq %= 3;
  Toy.step[seq] = 80;
  return 1;
}

int second(int seq) {
  Toy.step[0] = 0;
  Toy.step[1] = 100;
  Toy.step[2] = 0;
  Toy.step[3] = 50;
  return 1;
}
This example creates a Nunchuck with the c_update and z_update functions – these functions return the button state to the OneButton library so that it can handle click events. We then create the c_click, c_doubleclick, and z_click functions. These are functions that we’ll attach to a C-click, C-double-click, and Z-click event, respectively.
In setup(), we start the Nunchuck connection, attach our click handlers, and then add in a few patterns to manipulate (sharp_ramp, weird2, weird3, flicker, second).
runShortPattern()
#include <OSSex.h>
#include <Wire.h>

int pattern[][4] = {
    {200, 200, 200, 500},
    {0, 0, 0, 500},
};
unsigned int patternSize = sizeof(pattern) / sizeof(int) / 4;

bool clicked = false;

void setup() {
  Toy.attachClick(click);
}

void loop() {
  if (clicked) {
    Toy.runShortPattern(*pattern, patternSize);
  } else {
    Toy.setOutput(-1, 0);
  }
}

void click() {
  clicked = !clicked;
}
A short example of runShortPattern(). We create the pattern in the two-dimensional array pattern: turn all motors to a power level of 200 for 500 milliseconds, then turn them all off for 500 milliseconds. We also attach a click handler for a button single-click: if the button is clicked, the clicked flag is toggled.
In loop(), we check the status of the clicked flag. If it’s true, we run the pattern, if not, we turn the motors off.
Full function reference
Toy
Turn motor 2 on to a power of 122:
Toy.setOutput(2, 122);
The object created by OSSex for manipulating your toy. All OSSex functions work with the Toy object.
WiiChuck
Set up a nunchuck:
WiiChuck nunchuck = WiiChuck();

void setup() {
  Toy.setHackerPort(HACKER_PORT_I2C);
  nunchuck.begin();
}

void loop() {
  nunchuck.update();
}
The class for interfacing with a Wii Nunchuck. See the WiiChuck section for more details.
setOutput
int OSSex::setOutput(int outNumber, int powerLevel);
Turn motor 2 on to a power of 122:
Toy.setOutput(2, 122);
setOutput() turns a motor (an output) on or off on your toy. Range is from 0-255 inclusive. powerLevel of 0 turns the output off. outNumber of -1 sets all outputs to that powerLevel. More info here.
setLED
int OSSex::setLED(int ledNumber, int powerLevel);
setLED() sets a given ledNumber to a given powerLevel. powerLevel is constrained from 0 to 255 inclusive, with powerLevel of 0 turning the LED off.
This function does not yet support the -1 shorthand to apply powerLevel to all LEDs.
setID
void OSSex::setID(int deviceId);
setID() is used to declare what type of toy you’re using. Currently the only real option is 1, for a first-generation Mod/Dilduino. OSSex will create a Toy object and call setID(1) on it, so you won’t need this unless you’re working with another toy definition.
runPattern
int OSSex::runPattern(int (*callback)(int));
int OSSex::runPattern(unsigned int pos);
runPattern() will run a vibration pattern. If the argument is a function, it will start the motors vibrating however function directs. If the argument is an integer, it will start the pattern located at position pos in the pattern queue. (See also Queuing Patterns.)
runShortPattern
int OSSex::runShortPattern(int* patSteps, size_t patternLength);
int pattern[][4] = {
    {200, 200, 200, 500},
    {0, 0, 0, 500},
};
unsigned int patternSize = sizeof(pattern) / sizeof(int) / 4;

void loop() {
  Toy.runShortPattern(*pattern, patternSize);
}
runShortPattern() runs the vibration pattern provided in the patSteps array. Since ararys are passed by reference in C, the array size must also be provided. See the runShortPattern() section.
nextPattern
int OSSex::nextPattern();
Move to the next pattern in the queue. See the Queuing Patterns section.
previousPattern
int OSSex::previousPattern();
Move to the previous pattern in the queue. See the Queuing Patterns section.
addPattern
int OSSex::addPattern(int (*patternFunc)(int));
Add a pattern function patternFunc to the pattern queue. See the Queuing Patterns section.
getPattern
int OSSex::getPattern();
Returns the current pattern’s position in the queue, starting at 0. See the Queuing Patterns section.
getInput
unsigned int OSSex::getInput(int inNumber);
This is a wrapper for analogRead(). On a Mod, you can read from either input 0 or input 1, and this corresponds to the inputs available on the Hacker Port. See the Hacker Port section for more info.
attachClick, attachDoubleClick, attachLongPressStart, attachLongPressStop, attachDuringLongPress
void OSSex::attachClick(void (*callback)());
void OSSex::attachDoubleClick(void (*callback)());
void OSSex::attachLongPressStart(void (*callback)());
void OSSex::attachLongPressStop(void (*callback)());
void OSSex::attachDuringLongPress(void (*callback)());
These functions attach a function callback to execute in response to a button click, double-click, or click-and-hold action. Time-based functions like delay(), millis(), or Serial commands will not work properly in callback See the Button Behavior section and the Caveats section.
setPowerScaleFactor
float OSSex::setPowerScaleFactor(float powerScale);
Sets the power scaling factor for vibration patterns. The scaling factor starts at 1.0, meaning all patterns run at 100% of normal power. Changing the scaling factor to 0.5 would reduce all vibration patterns power to 50%, for example. See also the Modifying Running Patterns section.
getPowerScaleFactor
float OSSex::getPowerScaleFactor();
Returns the current power scaling factor. See also the Modifying Running Patterns section.
setPowerScaleStep
void OSSex::setPowerScaleStep(float step);
Sets the step by which the power scaling factor will be increased (or decreased) with each call to increasePower() (or decreasePower()). See also the Modifying Running Patterns section.
setTimeScaleFactor
float OSSex::setTimeScaleFactor(float timeScale);
Sets the time scaling factor for vibration patterns. The scaling factor starts at 1.0, meaning all patterns run at normal speed. Changing the scaling factor to 0.5 would cause all patterns to run twice as fast (since each step is half as long). See also the Modifying Running Patterns section.
getTimeScaleFactor
float OSSex::getTimeScaleFactor();
Returns the current time scaling factor. See also the Modifying Running Patterns section.
setTimeScaleStep
void OSSex::setTimeScaleStep(float step);
Sets the step by which the time scaling factor will be increased (or decreased) with each call to increaseTime() (or decreaseTime()). See also the Modifying Running Patterns section.
increasePower
float OSSex::increasePower();
Increases the power scaling factor by the power scaling step. If the power scaling factor is 1.0 and the scaling step is 0.1, the first call to increasePower() will increase the scaling factor to 1.1 (1.0 * (1.0 + 0.1)), and patterns will run at 10% higher power, the second will increase it to 1.21 (1.1 * (1.0 + 0.1)), etc.
decreasePower
float OSSex::decreasePower();
Decreases the power scaling factor by the power scaling step. If the power scaling factor is 1.0 and the scaling step is 0.1, the first call to increasePower() will decrease the scaling factor to 0.9 (1.0 * (1.0 - 0.1)), and patterns will run at 10% less power, the second will increase it to 0.81 (0.9 * (1.0 - 0.1)) , etc.
increaseTime
float OSSex::increaseTime();
Increases the time scaling factor by the time scaling step. If the time scaling factor is 1.0 and the scaling step is 0.1, the first call to increaseTime() will increase the scaling factor to 1.1 (1.0 * (1.0 + 0.1)), and patterns will run 10% slower, the second will increase it to 1.21 (1.1 * (1.0 + 0.1)), etc.
decreaseTime
float OSSex::decreaseTime();
Decreases the time scaling factor by the time scaling step. If the time scaling factor is 1.0 and the scaling step is 0.1, the first call to increaseTime() will decrease the scaling factor to 0.9 (1.0 * (1.0 - 0.1)), and patterns will run 10% faster, the second will increase it to 0.81 (0.9 * (1.0 - 0.1)) , etc.
stop
void OSSex::stop();
Stops all motors, resets the pattern queue to the beginning, and resets power and time scales to 1.0.
setHackerPort
int OSSex::setHackerPort(unsigned int flag);
Set the Hacker Port mode. See the Hacker Port section.